DIY Water Injection


In the early days of Dawes Devices, we experimented extensively with creating a water injection kit that could be built for fraction of the cost of a purchased system, but would work just as well. This page was the most popular entry page at our old web site. The original system was designed to work with a non-intercooled Dodge Daytona* and so, some of the specific information may not apply to all vehicles. Also, some of the specific part numbers have changed since the article was written in 1999. However where possible, we have updated the part numbers with Amazon links. Look for the links after each part description.

*Note that this system was designed to be used BEFORE the turbo and as such, uses a low pressure pump. However, the system can be adapted to inject AFTER the turbo, by the addition of a high pressure pump, such as the Shurflo types available HERE, on Amazon.

This article is presented in three parts. The “Overview” , the “How To” and then the “Installation Instructions”. At some point we’ll try to combine them, but if you just read down the page, you’ll get them in the intended order. Enjoy!

–Darren Dawes

P.S. Don’t bother emailing us to warn that injecting before the turbo will erode the turbo compressor blades etc. We appreciate your concern. However we used this system for over 50K miles with distilled water or water and alcohol and have found this particular myth to be just that–a myth.


DIY (Do-It-Yourself) Water/Alcohol Injection System and Intercooler Sprayer


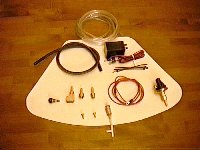
The original “kit”, no longer for sale (because you can build your own for less!)

In the interest of benefiting our fellow turbo enthusiasts, we have decided to provide a “how-to” and parts list to construct your own budget, water injection system.


We’re sorry, but despite multiple references to the “kit”, we no longer offer one for sale.
All Intercooled and non-intercooled turbo engines. Although these pages were written for a system that injects before the turbo, the higher pressure pump listed in the “how-to” section should allow injecting AFTER the turbo.
To allow more boost by suppressing detonation–also known as the poor man’s intercooler. This system may also be used as a cooling device for your intercooler. A small bracket, to position the nozzle, is all that you need to provide.
Our kit is designed for the budget enthusiast. We have developed unique solutions to some of the more expensive pieces sold in other kits. We feel that we have struck a good balance between price and functionability. Additionally, we provide a special nozzle that vaporizes the water charge before it is ingested by the engine. This results in better cooling of the air entering the turbo and significantly reduces any abrasion that may occur when the water meets to turbo blades. The added cooling provided by vaporization of the charge increases power. This method is far superior to the squirt nozzles that are sometimes mistakenly used in home grown systems. When used as an intercooler sprayer, the vaporizing nozzle provides good distribution at the airflows encountered “at speed”
Recently, while building a water injection system for friend, it occurred to me that others may have a need for such a system, but lack the time required to gather the proper components. Additionally, even the most basic systems on the market cost twice as much(Spearco), and the really good systems (ERL) approach $1000. No one seems to provide a basic system at a fair price. So, you can reproduce ours using the “how to” section.

Note: Please read the FAQ and how-to section, carefully. Dawes Devices cannot be held responsible for damage occurring from misuse or non-compliance with the anti-siphoning guidelines.

Water Injection Facts:


When increasing the boost level of a turbocharged vehicle, an undesirable byproduct is an increase in intake temperatures as well as a corresponding increase in combustion temperatures.. These higher intake temperature increase the chance of detonation within the cylinder. The best solution is to add an intercooler when the boost pressure exceeds 12 psi, but this is not always practical due to cost and packaging limitations. The early Chrysler TI (drawthrough) turbo engines are a good example of packaging limitations. It is somewhat difficult to fit an aftermarket intercooler to the factory manifold. This makes it a good candidate for water injection.

Water injection decreases the possibility of detonation by lowering the combustion chamber temperatures and increasing the effective “octane” of the fuel. This allows the engine to run a higher boost and full spark advance without the use of race gas. Additionally, if the water is atomized in the intake stream, there is an additional cooling of the intake charge. Both effects are increased with the inclusion of 50% alcohol to the mix (don’t spray the exterior of an intercooler with alcohol!, this refers to internal injection only). The additional fuel of the high octane alcohol will in turn allow boost beyond what the factory fuel system can deliver.

Water injection also has the effect of “steam cleaning” the combustion chambers and exhaust valves. This removes the carbon build up that decreases efficiency and leads to pre-ignition (detonation). It will also keep the throttle body and interior of the intake manifold much cleaner than normal.


Water Injection FAQ

1Will water injection increase my horsepower?
Yes, but not directly. Water injection works to eliminate detonation, also known as knock. The big gains come from the ability to increase boost as well as the full ignition advance allowed by the ECU when it does not detect knock. While the cooling of the intake charge will produce some power increases, those increases are cancelled by the charge space occupied by the water vapor. In other words, there is slightly less room for air and fuel. However, by using up to 40 percent alcohol with the water, additional cooling takes place before the turbo, and the alcohol works as a fuel in the charge. This results in an increase in power.
2Is water injection new?
No. Water and Alcohol injection was used during WWII to surprises detonation in fighter aircraft and increase their service ceiling.
3Does the water “burn” in the engine?
No. The water simply converts from a vapor to a gaseous state which absorbs huge amounts of heat, due to the energy required to transform it.
4What if my engine has an intercooler?
We do not suggest injecting water before the turbo in an intercooled application, as most of the water will condense out at the intercooler. However, our system works great as an auxiliary sprayer to increase the efficiency of your intercooler. In this application, water (add ice if you wish) is sprayed on the exterior of the intercooler to carry away the heat. Simple, easy, and effective. Subaru WRX rally cars use the same type of sprayer on their intercooler (but I bet it cost more).
5Do I need an extra “tank”?
No. Our systems are designed to use the original washer fluid tank (most have a built in level sensor), but you may choose to add a separate tank which you supply. The alcohol/water mix actually works like washer fluid, so you can kill two birds with one stone.
6How often do I need to fill the tank?
It all depends on how often you use the system (it’s only active under high boost) and how big the tank is. Even the smallest tanks will last for 8 full 1/4 mile runs or so. In around town driving (racing?) a tank full should out last a tank of gas.
7What do I need to install the system?
In addition to the parts in the “how-to” section, you will need the following:

-An 1/8 in pipe thread tap for the water fitting to your washer tank as well as the appropriate drill bit ($6 for both at the hardware store)

-Optional—you may wish to use a solenoid valve to cut off water flow when the system is idle. We provide a siphon block to provide this function, but it must be mounted above the washer tank. In some applications it is more practical to use a solenoid valve. You can get one for a couple bucks at the boneyard. The boost control solenoid, from the passenger side fender of most Dodge turbo cars works great. We do not supply solenoid valves due to the high cost of a “new” unit.

-Optional—I prefer to use the washer tank as my water supply, but you may want to use a separate tank.

-A switch to turn the system on.

Water/Alcohol Injection
“How-to”


I originally began this project to help someone with an early Chrysler T1 who did not want to go through the trouble of intercooling. The goals were to suppress detonation at high boost (15-18psi), on pump gas, while spending as little money as possible. For details of how water injection does this, read the page that brought you here. This system is not solely designed as a means to increase fuel flow. At one time, I intended to offer this system in kit form. However, in keeping with the “budget” nature of this project, I can not use some of the better components that my customers expect. By providing this how-to page, I intend to clearly illustrate how you can duplicate this system yourself. Note that you may upgrade the components as you budget allows, to increase the durability of the system, but the “budget” model works just fine.


Most people that I spoke to who have made there own water injector have used a small orifice that “squirts” the water into the mouth of the turbo. They rely on the turbo to completely atomize the water. The problem with this is that it is highly abusive to the compressor blades. Eventually, it will erode the leading edge of the blade, just like a sandblaster. If you are using this system primarily as a means to increase fuel, rather than for cooling, you may need to resort to the squirt method to get enough fuel. Multiple misting nozzles could achieve a higher flow, but the complexity would be prohibitive. I used a misting nozzle from McMaster-Carr to atomize the water prior to the turbo and avoid this problem. Of course, you need a pretty high flow nozzle to equal the volume of the “squirt” method. I used part # 3178K87, which is nickel plated and has it’s own filter screen. By atomizing the water prior to injecting, so far there has been no visible wear. You will need to mount the nozzle in an elbow with a hose nipple on the other side, to allow for the fluid input. I had to search the bins at the local hardware stores until I found some elbows that would clear the nozzle’s screen. Cost: about $3 for the elbow, about $5 for the misting nozzle, and about $6 for ten hose nipples (Mc Master #5346K11), you will use the nozzles elsewhere on this system.
In keeping with the budget nature of the project, I explored several low cost pumps and found that a basic”Roberk” brand(P50), replacement washer pump supplied the required of water pressure that I needed. I’ve been informed that the Trico brand Part # 11-603 is the same pump. The “dead-head” pressure of these pumps approached 40psi, but it drops as the flow increases. To inject after the turbo (or post-intercooler), you could use an electric fuel pump to attain higher pressures. You may have to use a smaller mister nozzle if you decide to go this route. Cost: about $13, available at “Builders Square”, but it may take you 3 hours to get through their damn line..(update, Builders Square got annihilated by Home Depot…probably because of their lines. ;)

Update 2014: Here is a link to the Trico pump, on Amazon. There are lots to choose from if you want something better.
Some water injection systems use a pressurized tank (pressurized by boost) for the water supply. Because I intended to use alcohol at some point, I didn’t like the idea of a constantly pressurized plastic tank, and the metal ones were too expensive for my friend. So, I decided to use the factory washer tank. This way, I did not have to purchase an additional tank, and there was no problem finding a suitable location. As it turns out, the water/alcohol mix does a very good job of cleaning glass, so the tank still performs it’s original function. An added benefit was that the factory “low washer fluid” light could be used to show when the fluid ran low. You will have to drill and tap a hole for a 1/8″ pipe thread. This is where you screw in the fitting for the new fluid to pump supply. You will need an 1/8″ pipe thread tap w/drill bit and a hose barb fitting. Mc Master #5346K11. Cost: about $6 for a pack of 10.

Update 2014: Link: You can now buy tanks on Amazon and some (like this one) come WITH a pump!
Why is this section with capital letters? Because if you screw up here, you can hydro lock the engine. If you mount the discharge nozzle lower than the water source, the water will siphon through the hose and the tank will empty into the turbo the first time you use the system. This is easy to prevent by using a siphon block. However, it is best to mount the nozzle at the highest point in the intake system that you can find. On Chrysler turbos, this is in the hose exiting the airbox. This will minimize, BUT MAY NOT PREVENT, siphoning. If, after “blipping” the system (turning it on/off for a couple seconds), the fluid does not drain back from the nozzle you need a siphon block. Do this test with the engine idling, as the vacuum in the intake may affect the siphoning action. For a siphon block, I used an aquarium check valve mounted to a vacuum tee. Tip the tee on it’s side and mount the check valve to one end. You should be able to blow in the free end of the check valve, but if you blow from the other end, it should feel blocked. Attach the output of the pump to one of the free nipples, and the hose leading to the nozzle on the other one. When the system is activated, the tubes will fill with fluid. When it is deactivated, the tube to the nozzle should drain itself, and not refill until the system is reactivated. In other words, when the pump shuts off, no more water flows out of the tank. If the water continues to flow out, elevate the siphon block. My Daytona used this system with the water going into a turbo mounted filter. Since the nozzle position is much lower then normal, this should be a worst case example for siphoning. With the siphon block mounted at the base of the windshield, I have had no problems. If siphoning continues to be a problem, or you want an extra margin of safety, you can use a solenoid valve to block the flow. Just wire it into the output side of your pressure switch. You can use the boost control solenoid from a post 84 T1 application. Since mine is no longer being used (see our Hybrid Boost Controller) I used mine to test this method. It worked fine. However, I don’t supply one in the kit, since it’s usually not needed. Cost: $3, for the check valve.

Update 2014: You can get the anti siphon check valves on Amazon, here.
It should go without saying that you should only use pure alcohol with DISTILLED water. You can buy the water at the grocery store, but make sure it’s DISTILLED, not plain drinking water. Also, wash out the tank before you begin. Having done that, you can add a small filter to the line if you prefer. Since the nozzle I use has a small screen on it, I have not found a filter to be necessary. Just check it for blockage periodically, and before going to the track. For an extra margin of safety, add a small, see through, gas filter in the line.
For the water outlet on the tank I used McMaster #5346K11, which is a 3/16″ hose barb with 1/8″ male pipe thread on the other end. The tubing is clear,3/16″ I.D. ,alcohol resistant plastic, safe to 60psi. Use clear tubing, so you can be sure your siphon block is working. To accommodate the connection to the misting nozzle, I had to use a brass elbow to provide clearance for the screen. Unfortunately, I bought this at the hardware store, so I don’t have a part number. You will have to bring the nozzle with you to the store and check the fit.

Update 2014: I’ve got some really nice silicone hose for sale at Dawes-Devices.com. Here is the link.
For initial testing purposes, I used a pushbutton switch mounted on my shifter to activate the system. This way, I could activate the system manually to easily compare before and after results. Unless you are using this system as an external intercooler sprayer, you will probably want to use the following Hobbs normally open pressure switch: Part number 76575 (NAPA#701-1575), which you can get at NAPA auto parts. This switch triggers at 5psi, but you can set it higher by using a bleed. The switch cost $25 and the bleed about $2. This makes it cheaper than an adjustable switch by about $8 (hey, it’s a “budget” system).

UPDATE 2014: There is a better, adjustable pressure switch available on Amazon. You can find it at this link.
I strongly suggest you use one. Put it in line, between the battery and the switch. A 10A fuse should cover most pumps, but if you have a really big one (pump that is), you may need a bigger fuse.

Update 2014: Amazon to the rescue again, with a waterproof fuse holder for 3 bucks. Here’s the link.
Many people use methanol for the alcohol portion of their fluid, but I have found a few drawbacks. First, methanol is highly toxic and a known carcinogen. Second, it can be hard to come by. Third, it’s highly corrosive. So, I decided to use denatured alcohol which is available at the local hardware store ($7 a gallon). Denatured alcohol is ethanol with a little methanol added so you can’t drink it. Although it’s still toxic, it’s far less poisonous than straight methanol. You’ll probably just go blind if you drink it, but maybe you won’t die. Ethanol, by the way, is just good old booze in it’s purest form. But again, don’t drink denatured alcohol. For the water portion, use only distilled water. You don’t want to clog the misting nozzle. You can adjust the mixture percentage as you see fit, but I recommend at least 20% water to get some of it’s cleaning and in-cylinder cooling benefits.
Using this system, I have measured nearly a 90 degree drop in charge temperature at 14psi. This was somewhat unexpected. Realize that since the water vapor occupies some of the space normally occupied by air, the power gain is not comparable to what a 90 degree drop with an intercooler provides. But I am happy with the results. I am also able to run 15psi with 15 degrees advanced timing. The friend that I built the prototype system for, is running 16psi without a problem. These measurements were made on a 90+ degree day. Power delivery feels smoother and my plugs show no signs of detonation.


Hose Layout for Before Turbo Water Injection


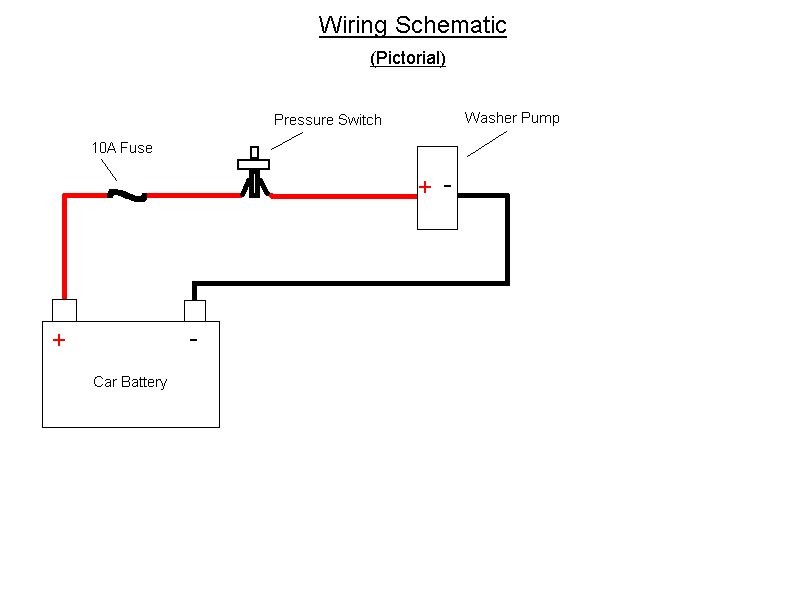
Wiring Diagram for Water Injection

Water/Alcohol Injection Installation Instructions


Please read all instructions before beginning.

Remove the plastic fairing that conceals the washer tank and air vent intakes. This will give you easy access to the tank. Find a location on the side of the tank where you will mount the 1/8″ NPT(male) by 3/16 ” hose barb fitting. This location should be on the side of the tank, as close to the bottom as possible. Make sure that you will have clearance to mount the fitting and run a hose back toward the center of the drain channel. Mark this spot on the tank with a permanent marker or a scribe. Remove the washer tank by disconnecting the hoses, removing the mounting screws, and unplugging the existing pump motor. Leave the existing pump, it will continue to serve its function. Let the fluid drain before lifting the tank. Using your mark as a guide, drill and tap a hole for an 1/8″ NPT(pipe thread) fitting. You can get the drill and tap at a local hardware store. Next, clean the tank to remove any plastic pieces and sediment build up. I suggest a soapy solution and a “bottle brush” . Follow this with a 50/50 water/alcohol solution. You don’ t need to fill the tank, just a cup or so will do. Rinse the tank with clean water. Wrap the 1/8″ NPT (male) by 3/16″ hose barb fitting threads(not the hose end) with teflon pipe tape (2 turns). Be careful not to leave any loose pieces in the system as they can block the flow! Thread the fitting in, finger tight, then 1/4 turn by wrench. Attach the 10ft. piece of clear tubing to the hose barb and re-install the washer tank. You can ease the fit of the tubing with a little spit or K-Y jelly on the barb. Don’t use petroleum based jelly as it will stay in the system and attract dirt.
The pump may be located anywhere you wish, as long as the “IN” fitting is below the minimum water level. The pump must also be positioned upright, so that the fittings are near the bottom of the pump. I found it convenient to mount the pump in the drainage channel near the was her tank. You can also mount the pump on the side of the tank and seal the screw hole with RTV. Now, run the hose that you attached to the tank, to the”in” fitting on the pump. Leave enough slack in the hose so it cannot kink. The length is unimportant; a long hose just increases your capacity (no pun intended). An added benefit of using the drainage channel for this system is that it will divert the fluid safely to the ground, should a leak develop.
If you plan to manually activate the system, you will want to mount a switch in the cabin. I prefer a pressure switch and have included one in the kit. It may be located anywhere, but you will have to run a vacuum tube to it, so keep this in mind. Again, I chose the drainage channel for a neat installation. I attached it to the screen on the air vent with a ty-rap. Now, run a length of vacuum hose to a source of boost pressure. This can be a nipple on the turbo outlet, the throttle body, or the intake manifold. A tee into an existing line may give you more options. If you mounted the switch in the drainage channel, cut a small slot in the weather stripping, so the tube will not be crushed when the hood is closed. If you want to make your switch adjustable, mount a vacuum restrictor and brass bleed valve (aquarium store), in the line. The bleed should go between the restrictor and the switch. Leave the bleed closed for now.
Using the wiring diagram as a guide, connect the red wire of the pump to either of the terminals on the switch. Connect the black wire to any good ground. I find it convenient to use the screw that holds the windshield washer hoze(to the washer nozzle)in place, but anywhere on the body will do. Connect the red wire with the fuse holder to the other terminal on the switch. The other end will go to the + terminal of the battery or a switched 12v supply.
The misting nozzle can be mounted anywhere after the airbox and before the turbo. I have a K&N filter directly mounted to my turbo, with the fitting mounted on the end, pointing toward the compressor. Airflow is sufficient under boost, that the nozzle need not be mounted at the turbo, the air stream will carry the vapor along. For that reason, I suggest that you mount the nozzle at the top of the turbo “in” hose, where it meets the air box. This way, the tendency to siphon will be reduced. Check first, that you have clearance between the hose and the hood. Drill or cut a ROUND hole slightly smaller than the misting nozzle, in the hose. The hole must be smaller to properly seal around the nozzle. Wrap 1 and 1/2 turns of teflon tape around the nozzle threads and insert the nozzle into the hose, from the inside, so that the screen is now on the exterior of the hose. It is advised that you use a washer on the inside of the hose to prevent the nozzle from pulling out. I don’t supply these, because every installation requires something a little different. At this point, you may wish to leave the hose off of the airbox. That way, when you test the system, you can watch the nozzle to confirm all is working well. Connect the hose barb from the misting nozzle to the “out” side of the pump with a length of clear tubing. Be careful not to kink the hose or place it where the hood will crush it, or hot/moving parts will contact it.
Fill your washer tank with water(for testing) and check your connections for leaks. You will notice that water will flow into the hose until it reaches the level of the water in the tank. If water flows all the way to the nozzle, remove the hose(allowing the tank to drain) from the nozzle and proceed to the section below entitled “Siphon Block”. If the water does not reach the nozzle, then you are ready to activate the system. If you wired the pressure switch to a “switched” 12v supply, then turn the key to the “on” position. Using a short length of wire, jumper the two connections on the switch(be careful that the wire does not touch the body). The pump motor will turn on and water will flow to the misting nozzle. The pump will buzz loudly, so remember to jump a foot in the air, like I did. Remove the wire jumper and observe the water flow. It should drain back from the nozzle. If it doesn’t, proceed to the “Siphon Block” section. If the flow stops when you shut the system off then you are almost done. Observe the mist from the nozzle when the system is activated, if it is spraying then you may reconnect the hose to the airbox. Now start the car and repeat the above test to ensure that the water drains back down the hose when the system is shut off. If so, then you are ready to take it for a drive. Make a few full throttle blasts to the speed limit to use up some of the water. If you have a 12v light connected to the output of the pressure switch, you will be able to see when the system turns on. Note the fluid level when you stop the car, it should have gone down a little. If you do not have a “low-fluid” level indicator, you must be careful not to run the system dry, as the pump life will be shortened significantly. At this point, make one more check to ensure that the water has drained back from the nozzle.
Why is this title with capital letters? Because if you screw up here, you can hydrolock the engine. If you mount the discharge nozzle lower than the water source, the water will siphon through the hose and the tank will empty into the turbo the first time you use the system. This is easy to prevent by using a siphon block. However, it is best to mount the nozzle at the highest point in the intake system that you can find. On Chrysler turbos, this is in the hose exiting the airbox. This will minimize, BUT MAY NOT PREVENT, siphoning. If, after “blipping” the system(turning it on/off for a couple seconds), the fluid does not drain back from the nozzle you need a siphon block. Do this test with the engine idling, as the vacuum in the intake may affect the siphoning action. For a siphon block, I used an aquarium check valve mounted to a vacuum tee. Tip the tee on it’s side and mount the check valve to one end. You should be able to blow in the free end of the check valve, but if you blow from the other end, it should feel blocked. Attach the output of the pump to one of the free nipples, and the hose leading to the nozzle on the other one. When the system is activated, the tubes will fill with fluid. When it is deactivated, the tube to the nozzle should drain itself, and not refill until the system is reactivated. In other words, when the pump shuts off, no more water flows out of the tank. If the water continues to flow out, elevate the siphon block until it does not. My Daytona currently uses this system with the water going into a turbo mounted filter. Since the nozzle position is much lower then normal, this should be a worst case example for siphoning. With the siphon block mounted at the base of the windshield, I have had no problems. If siphoning continues to be a problem, or you want an extra margin of safety, you can use a solenoid valve to block the flow. Just wire it into the output side of your pressure switch. You can use the boost control solenoid from a post 84 T1 application. Since mine is no longer being used (see Hybrid Boost Controller) used mine to test this method. It worked fine. However, I don’t supply one in the kit, since it’s usually not needed.
You can add alcohol to your water tank during cold weather(to prevent freezing, 50/50), or to add fuel while under boost. I like to keep at least 20% water in the mix to get it’s anti-detonant and cleaning effects. Remember that water injection is not a substitute for an excessively lean air/fuel mixture. If you plan to use this system to supplement increased boost, you should get an EGT gauge, or an air/fuel gauge. If you are primarily concerned with using this system as a fuel enrichment device, you may wish to add additional misting nozzles to achieve the flow that you require. Observe the misting action as you add nozzles, if it begins to lag, an extra pump can be added in series with the first. Last thing…….DO NOT USE GASOLINE IN THIS SYSTEM!!! (DUH!)

You write a review after buying our products and we’ll pay you a bounty

No strings attached!


Translate »